
**Category:** Switching & Routing Fundamentals
**Level:** Beginner
Learning Objectives:
By the end of this lab, learners will be able to:
– Configure hostnames and interface descriptions on Cisco IOS devices
– Set up MOTD, login, and exec banners for legal/security notices
– Secure console and VTY (Telnet/SSH) access with passwords and encryption
– Enable and configure SSH as a secure remote management protocol
– Save, back up, and restore device configurations
Topology:
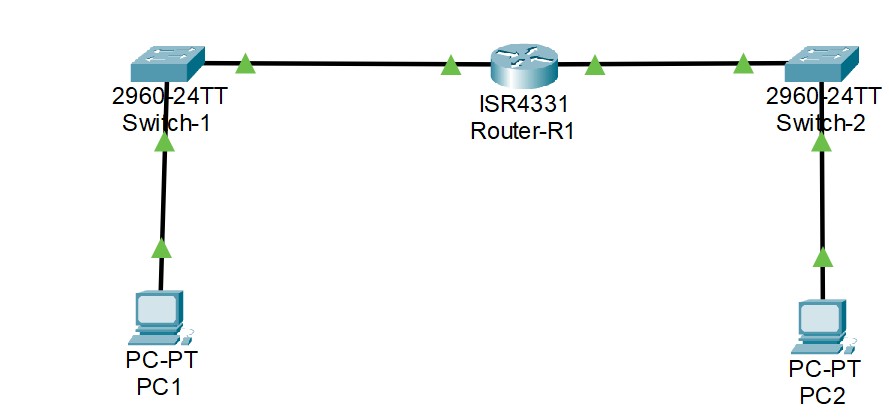
“`
– Router-1: 1 router, connected to Switch-1 (Gi0/0) and Switch-2 (Gi0/1)
– Switch-1, Switch-2: Layer 2 switches
– PC-1, PC-2: end hosts for connectivity verification
Initial Setup
Before starting, ensure all devices are in factory-default state (`erase startup-config` + `reload`, or delete `vlan.dat` on switches).
Task 1 — Hostnames and Interface Descriptions
Set up interface descriptions and hostnames for each of the three devices.
“`
Router> enable
Router# configure terminal
Router(config)# hostname Router-1
Router-1 (config)# interface gi0/0
Router-1 (config-if)# description Connection-to-Switch-1
Router-1 (config-if)# no shutdown
Router-1 (config-if)# exit
Router-1 (config)# interface gi0/1
Router-1 (config-if)# description Connection-to-Switch-2
Router-1 (config-if)# no shutdown
“`
Repeat with `hostname Switch-1` and `hostname Switch-2` on the switches, describing their uplinks accordingly.
**Verification:**
“`
Router-1 # show interfaces description
Interface Status Protocol Description
Gi 0/0 up up Connection-to-Switch-1
Gi 0/1 up up Connection-to-Switch-2
Task 2 — Banners
Configure a **MOTD banner** (shown before login) and a **login banner** (shown after MOTD, before credential prompt) on all devices.
“`
Router-1 (config)# banner motd #
THIS DEVICE IS NOT AVAILABLE FOR UNAUTHORIZED USE.
To access this system, you need certain authorization.
Every activity is recorded and tracked..
#
Router-1(config)# banner login #
To proceed, please authenticate.
“`
> Use a delimiter character (e.g. `#`) that does not appear inside the banner text itself.
**Verification:** To ensure that both banners appear appropriately, exit config mode and rejoin (or use `show running-config | section banner`).
—
## Task 3 — Console Line Security
Secure the console port with a password and enable session timeout/logging.
“`
Router-1(config)# line console 0
Router-1 (config-line)# password Cisco123
Router-1 (config-line)# login
Router-1 (config-line)# exec-timeout 5 0
Router-1 (config-line)# logging synchronous
Router-1 (config-line)# exit
“`
– `exec-timeout 5 0` → disconnects idle sessions after 5 minutes
– “logging synchronous “→ stops command entering from being interrupted by console output.
—
## Task 4 — VTY (Remote Access) Security
### Step 1: Set enable secret (encrypted privileged password)
“`
Router-1(config)# enable secret Agh$ps$34
“`
### Step 2: Set up the domain and hostname (needed for SSH key generation)
“`
Router-1 (config)# ip domain-name ABC.com“`
### Step 3: Generate RSA keys for SSH
R1(config)# crypto key generate rsa
How many bits in the modulus [512]: 2048
“`
### Step 4: Create a local user account
R1(config)# username admin privilege 15 secret Adm1nP@ss$67
### Step 5: Configure VTY lines for SSH-only access
R1(config)# line vty 0 4
R1(config-line)# transport input ssh
R1(config-line)# login local
R1(config-line)# exec-timeout 10 0
R1(config-line)# exit
### Step 6: Enforce minimum SSH version
“`
Router-1(config)# ip ssh version 2
**Verification:**
Router-1# show ip ssh
Router-1# show running-config | section line vty
If any one try to login via telnet, attempt will fail because only SSH is configured as transport input ) and then SSH in successfully using the `admin` credentials.
## Task 5 — Encrypt Stored Passwords
“`
Ruter-1(config)# service password-encryption
This encrypts the running/startup configuration’s legacy plaintext passwords, such as the console line password. Note that this is not necessary because `enable secret` is already hashed by default (MD5 or SCrypt, depending on the iOS version).
## Task 6 — Save and Restore Configuration
### Save current config
Router-1# copy running-config startup-config
### Back up config off-box (TFTP example)
R1# copy running-config tftp://192.168.1.100/R1-backup.cfg
### Restore config from backup
Router-1# copy tftp://192.168.1.100/R1-backup.cfg running-config
### Verify saved config after reload
R1# reload
R1# show running-config