
Learning Objectives
After completing this lab, students will be capable of:
- On a Cisco switch, create and name VLANs.
- Assign VLANs access ports.
- Establish and confirm an 802.1Q trunk connection between two switches.
- Recognize and set up the native VLAN
- To prevent unintentional VLAN database overwrites, use VTP transparent mode or disable VTP.
Check for end-to-end VLAN connectivity and identify common trunk setup errors.
Topology:
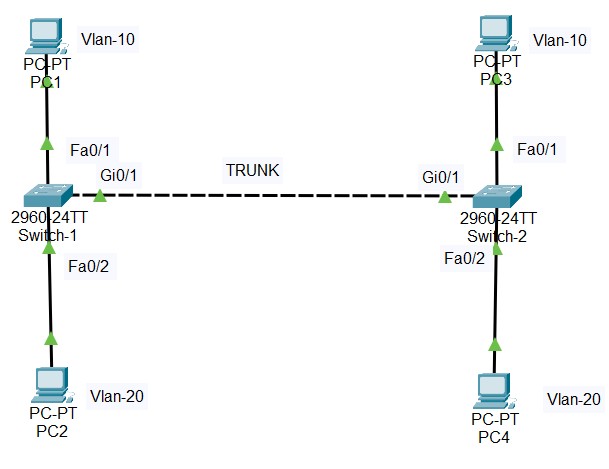
- SW1, SW2: Layer 2 switches, trunk link between Gi0/1 on each
- VLAN 10: “Sales” — Fa0/1 on both switches
- VLAN 20: “Marketing” — Fa0/2 on both switches
- PC-1/PC-3: same VLAN, different switches — should ping each other
- PC-2/PC-4: same VLAN, different switches — should ping each other
- PC-1 and PC-2: different VLANs — should not ping each other (no routing configured yet)
Task 1 — Create VLANs
On both SW1 and SW2:
SW1(config)# vlan 10
SW1(config-vlan)# name Sales
SW1(config-vlan)# exit
SW1(config)# vlan 20
SW1(config-vlan)# name Marketing
SW1(config-vlan)# exit
Verification:
SW1# show vlan brief
Task 2 — Assign Access Ports
On SW1:
SW1(config)# interface fa0/1
SW1(config-if)# switchport mode access
SW1(config-if)# switchport access vlan 10
SW1(config-if)# exit
SW1(config)# interface fa0/2
SW1(config-if)# switchport mode access
SW1(config-if)# switchport access vlan 20
SW1(config-if)# exit
Repeat identically on SW2 for its Fa0/1 (VLAN 10) and Fa0/2 (VLAN 20).
Verification:
SW1# show interfaces status
SW1# show vlan brief
Confirm Fa0/1 shows in VLAN 10 and Fa0/2 shows in VLAN 20.
Task 3 — Configure the Trunk Link
On both SW1 and SW2, configure Gi0/1 as an 802.1Q trunk:
SW1(config)# interface gi0/1
SW1(config-if)# switchport trunk encapsulation dot1q
SW1(config-if)# switchport mode trunk
SW1(config-if)# switchport trunk native vlan 99
SW1(config-if)# switchport trunk allowed vlan 10,20,99
SW1(config-if)# no shutdown
Only switches that support ISL (earlier Catalyst models) require switchport trunk encapsulation dot1q. Many latest model switches merely use dot1q and go directly to switchport mode trunk.
Why is a native VLAN (99) set?
Untagged traffic is transported across the trunk via the native VLAN. To lessen vulnerability to VLAN-hopping attacks, it is best to transfer it off of VLAN 1, which is the default. In order to prevent native VLAN alerts and possible traffic leakage, VLAN 99 must be built and match on both ends. Create VLAN 99 on both switches:
SW1(config)# vlan 99
SW1(config-vlan)# name Native-Vlan
SW1(config-vlan)# exit
Verification:
SW1# show interfaces trunk
Confirm:
- Gi0/1 is in trunking mode
- Native VLAN matches on both sides (99)
- Allowed VLAN list includes 10, 20, 99
Task 4 — Turn off VTP or switch to transparent mode.
Set both switches to VTP transparent mode to avoid one switch inadvertently overwriting the other’s VLAN database, which is a common real-world outage cause:
SW1(config)# vtp mode transparent
Verification:
SW1# show vtp status
Confirm mode shows Transparent.
Task 5 — End-to-End Connectivity Test
Assign IP addresses to the PCs
| Host | VLAN | IP Address | Subnet |
| PC-1 | 10 | 192.168.10.1 | /24 |
| PC-3 | 10 | 192.168.10.2 | /24 |
| PC-2 | 20 | 192.168.20.1 | /24 |
| PC-4 | 20 | 192.168.20.2 | /24 |
Expected results:
- PC-1 ↔ PC-3 (both VLAN 10, different switches): ping succeeds — traffic crosses the trunk
- PC-2 ↔ PC-4 (both VLAN 20, different switches): ping succeeds
- PC-1 ↔ PC-2 (different VLANs): ping fails — no inter-VLAN routing configured yet (this comes in Lab 3)
Verification Checklist
| Check | Command | Expected Result |
| VLANs created | show vlan brief | VLAN 10, 20, 99 present with correct names |
| Access ports correct | show vlan brief | Fa0/1 in VLAN 10, Fa0/2 in VLAN 20 on both switches |
| Trunk is up | show interfaces trunk | Gi0/1 listed, status = trunking |
| Native VLAN matches | show interfaces trunk | Native VLAN 99 on both ends |
| Allowed VLANs correct | show interfaces trunk | 10, 20, 99 in allowed list |
| VTP mode safe | show vtp status | Transparent on both switches |
| Same-VLAN ping works | ping from PC-1 to PC-3 | Success |
| Cross-VLAN ping blocked | ping from PC-1 to PC-2 | Fails (expected, no L3 routing yet) |
Troubleshooting Tips for Learners
- If the trunk is not forming (stuck in “not-trunking”), make sure both sides have switchport mode trunk set. Although one side left as dynamic auto/dynamic desired can occasionally still negotiate, it is best practice to have an explicit trunk on both ends to prevent DTP surprises.
- Native VLAN mismatch alert in logs: both ends of the trunk must have the same native VLAN number.
- Hosts in the same VLAN on separate switches are unable to ping: Make sure the VLAN is in the list of permitted VLANs on the trunk; it’s a typical error to trunk a link without allowing the VLAN to pass through it.
- Everything appears to be in order, but there is still no connectivity. Verify that the physical/PC-side IP addressing and subnet mask are accurate, and check the show vlan brief to make sure the port is in the correct VLAN in the running configuration.
- VLAN vanishes upon restart; verify that vlan.dat was saved (copy running-config startup-config); on some iOS versions, the VLAN database is kept apart from the running-config text file.